Diane's Vintage Zest!: rewind

Spicy Chorizo Cornbread Stuffing

A spicy spin on my Cornbread Stuffing that EVERYONE loves!

Sweet Potato Souffle for Thanksgiving

One of my most popular recipes EVER, and just in time for Thanksgiving!

DIY Painted Photo Backdrops

Super easy backdrops for your photo, plus a few tips!

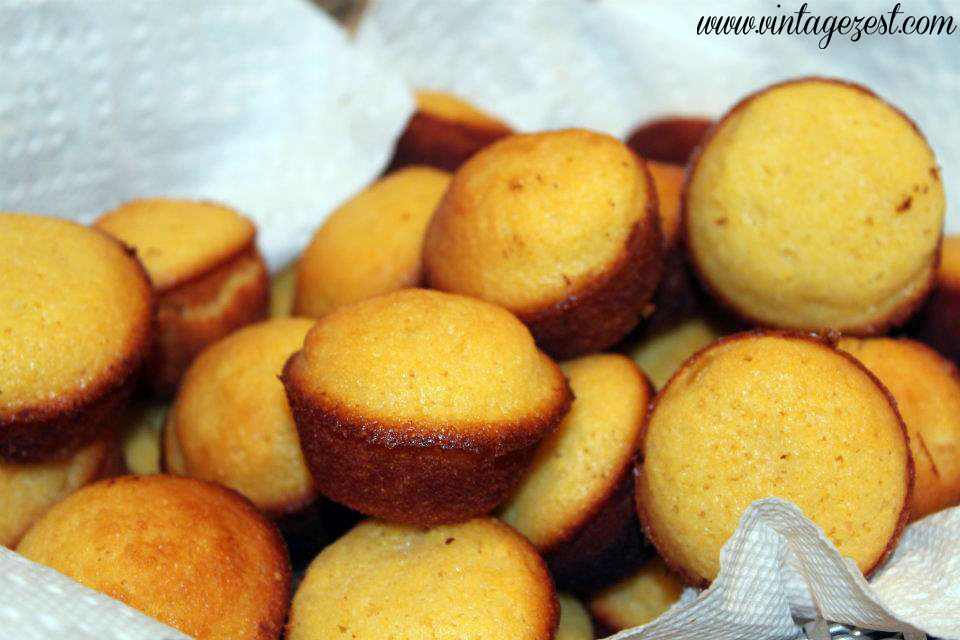
Golden Sweet Corn Bread Mini Muffins

A sweet spin on traditional cornbread!

Easy Sweet Potato Pie (without a crust!)

The easiest (and healthiest) pumpkin pie recipe ever!

Showing posts with label rewind. Show all posts

Craft Rewind: Friendship Bracelets

This is my last craft rewind post!  At least until I find more boxes stuffed with old projects.  :)  I have shared all of my past sewingcrochetknittingcross-stitching, and lanyards, and I will end on friendship bracelets!

Yep, that summer camp staple of friendship bracelets, which I loved when I was a kid.  I ended up making some fancier ones as I got older, which you can see below...


Craft Rewind: Friendship Bracelets on Diane's Vintage Zest!


I liked using a rainbow of colors, and it was really fun to make different patterns too.  Now, let me point out a couple of special ones.


Craft Rewind: Friendship Bracelets on Diane's Vintage Zest!


This one had a rubber cord that gave it a 3-dimensional look.  Notice that it is slightly wavy?  I think it was part of the plan, but I'm not sure...

Craft Rewind: Lanyards

It's time for another Craft Rewind!  I have already shared a ton of past sewing, crochet, knitting, and cross-stitching projects.  This time, it's a craft that I learned during summer camp.  How appropriate!  I made all of these when I was a kid because I was absolutely obsessed with making lanyards every summer.  I guess the crafting bug bit me early!


Craft Rewind: Lanyards on Diane's Vintage Zest!


The one on the very left is the first lanyard that I learned how to twist, instead of just making it a square/rectangle.


Craft Rewind: Lanyards on Diane's Vintage Zest!


Of course, I started off with easy 2 x 2 square lanyards, which were usually very long.


Craft Rewind: Lanyards on Diane's Vintage Zest!


THEN, I started making larger ones: 2 x 3 and 3 x 3.  I liked the twisty ones better, once I learned how to make them.

Craft Rewind: Cross-Stitching

Continuing with my craft rewind series of posts, I am bringing to you the very first craft that I remember seriously spending time doing.  I remember going to the store with my mom to buy new patterns, and I am sure that my mom still has a bunch of them!

Anyways, here are a few of my earliest creations.  :)


Craft Rewind: Cross-Stitching on Diane's Vintage Zest!


I don't know that this actually counts, but this is the very, very first cross stitching that I did.  It is obviously a kid's version of cross-stitching from when I was really young.  I actually remember doing this and having an "Aha!" moment when the picture started to form.  I was hooked!


Craft Rewind: Cross-Stitching on Diane's Vintage Zest!


There are a few other ones that I remember doing, but I couldn't find them right away in my mom's stash.  One of the first ones that I remember making was a rabbit wearing a bonnet and bloomers.  Also, I stitched a few gifts as well, so there is no access to those...  :(

I remember making this one in high school, and my mom hung this up in the hallway between my bedroom and my sister's.  Cute!  It still hangs there nowadays.  :)

Craft Rewind: Knitting!

Since I am busy studying for my test, I will have a series of rewind posts for my normal craft Wednesdays of items I made in the past, before blogging.

First up, everything I have ever knitted!  I first learned how to crochet in college and did it for a while, remember this post and this post?  I wanted to learn how to make something different, so I taught myself knitting out of a book.  :)


Craft Rewind: Knitting! on Diane's Vintage Zest!


This was the first thing I ever knitted.  I was excited to a cable knit sweater, which seemed like a good idea...until I realized that I don't know how to read patterns!  So for a long time, I had a rectangle of knit fabric, which was unused.  Bummer.

Later on, my friend suggested that I turn it into a purse, so I knit up the side, crocheted a flower, and added some handles.


Craft Rewind: Knitting! on Diane's Vintage Zest!


Not exactly my style, but still fun for a first project!


Craft Rewind: Knitting! on Diane's Vintage Zest!


My second project was a scarf!  I actually love this pattern a lot, but it is very subtle.

Crochet Rewind: Hats, Scarves & Blankets!

Remember how last year I shared the crocheted pouch for my external hard drive and mentioned that it would be my only crochet rewind?  Well, I have a little bit of a surprise for you!  I was thinking about how I have a definite lack of crafts on my blog, compared to the amount of recipes and food posts, so I wanted to share this all with you today!

I started crocheting my freshman year of college and thought it was really fun!  I have given it up in favor of sewing recently, only because I have more than enough warm items to wear, as you can see below, and I do live in California!  However, I realized after meeting Kate of Small & Great, there are so many other items to crochet and I am inspired to take it up again soon!


By the way, these are items that I had on hand to photograph, and you might have seen a couple of these in my Closet Clean-Out post already.  Let's take a peek!


Beanies

I actually have two of these identically ones because I had enough yarn in the skein to make a couple.  Although I only have two here, I actually once made about 80 of them one holiday season for our entire student government staff!  It was ridiculous!

I use these whenever it gets cold inside the house to avoid turning on the heater.  :)


 photo CrochetRewind1-Hats_zpsbaf83198.jpg


Beret

I decided to experiment with some extra green yarn and make a beret!  I also aded a little button flower, just for a bit of a cute factor.


 photo CrochetRewind2_zps1b2446fb.jpg


Here is the underside.  Neat!

Sewing Rewind: Grandma Edition!

Last week I promised it was my last sewing rewind and that I would focus on my future projects. I have to admit that I always planned on featuring a couple of my grandmother's old projects, some of which inspired my love of sewing.


Unfortunately, I was a terrible planner before my trip, so I only have 3 different projects to share. She made sooo many things for us before she passed, and I could only find a few items and/or photographs of items the day before I left. Oh well!


Wine Bottle Tuxedoes

This is obviously something that my mom asked my grandma to make. Back in the day, my parents used to host wine tastings, with mystery wines that the guests would have to guess. How bourgie!

Anyways, my mom wanted something to cover the bottles that would look cuter than a paper bag. I'm not sure who had the idea to make the covers into little tuxedoes, but they are definitely cute!


Sewing Rewind: First Projects Ever!

Well, this is my last sewing rewind post, cataloging my past projects. They have definitely been getting less exciting, but now I can focus on future projects! Last week, I posted about my fails, specifically right before documenting my first projects so I could reflect on how far I've come. Yes, maybe a bit self-serving to boost my confidence, but I needed it after some of those messes of projects!

Here they are in all their grandeur. ;)


Envelope Pillowcases

The very first project in my sewing class was to sew up some pillowcases. I had joined the class one week late, so I was just learning how to use a machine while everybody else made their pillowcases.

However, I kept an eye on what they were doing, so I could get it done quicker during the next class time. I bought some sale fabric from Joann's (same as from my now internationally famous tutorial) and was an overachiever and made two! I mean, who really needs just one pillow anyways!


Sewing Rewind: Fail Edition!

Now, why would I bother show you guys all of my fails?  Well, like I said in my Sewing Rewind: Works in Progress post, I wanted to show absolutely every one of my past projects, even if they ended up terribly.

In this post:


Boxy Quilted Pouch for my cousin

I had just learned how to make a zippered pouch, and I was interested in trying out a pattern for a boxy quilted pouch.  I was excited to tell my cousin about my new sewing hobby, and she said, "Make me something!"

Well, I didn't know how to tell her that it's hard to make something on demand without the appropriate supplies, so I decided to make it anyways.

I didn't have my DIY ironing board yet, so I was still cutting on the floor.  Disaster!


I quilted it wrong sides together, and it was so tiny in the end.  Probably just big enough for a few tissues or coins.  Oh well!


Black & Blue Top

From afar, this doesn't seem like a terrible top, but remember that the devil is in the details!


This was such a shifty fabric, that it was super difficult to cut.  The pattern pieces somehow were probably off, and then I made the mistake of trying to fix the pattern to what I thought would work best.  I ended making more of a mess, with a lot of puckering in the back.

Sewing Rewind: Bag & Pouch Edition!

Do you know the reason why I took my first sewing class?  I received an e-mail from one of those websites that send you daily deals.  It was $19 to make a tote bag, and even though I wanted to make garments, I was sold on just being able to touch a sewing machine for the first time.

I was excited to tell my friend at the gym, and she told me about the adult school that offered 8 weeks of classes for somewhere around $35.  REALLY?!?!?!?  And that's how I got started.

Of course, I couldn't start off making super tailored clothing.  I didn't even know what a bobbin was!  Therefore, I went along with the project syllabus during each class session.

Outside of class, I was super antsy!  I looked up all kinds of projects online and found tutorials galore!  Still, I was too timid to try out clothing on my own.  Thus, came my bag and pouch phase.  :)


Embroidered Tote Bag
The first bag I finished was the tote bag during my $19 class.  We started and finished it in the class time, while using their fancy embroidery machine.  


Although it turned out well, I didn't really feel like I had really made something on my own.  It was great, no doubt, but all of the materials were pre-cut.  The whole process seemed like one of those semi-homemade recipes, which is kind of cheating.

Crochet Rewind!

You're probably thinking, where did the crochet rewind come from?  Isn't this a sewing rewind series?  Don't worry, this will be the one and only of its kind, because I don't crochet much anymore and nobody wants to see a bunch of boring scarves that I made back in college!

Well, as you know, I shared with you my technology woes, and found myself in need of a good old-fashioned computer back-up from scratch.  That meant digging out my trusty external hard drive and firing up Time Machine to back up all my data since last time in...  September 2011!  Eep!

Anyways, I decided to snap a few pictures during the hours that my computer was backing up to share this with you!


Well, what is it?

Sewing Rewind: Gifts Edition!

It is better to give than it is to receive, right?  But for us crafters who DIY gifts, it can be a nerve-wracking to hand over a handmade present for scrutiny!

Here are a few gifts that I gave to friends and family over the past several months!

Disclaimer: These are all pictures taken with my phone, prior to the development of my still mediocre camera skills !


The first item I ever gifted to someone is the goggles case that I already blogged about here.  At least I had input prior to its creation, so I wasn't as nervous as I could have been...


Next, came an item for my cousin's kid's first birthday.  I wanted to sew something for a baby so desperately that I searched through a multitude of free baby clothes patterns.  But then I realized that I didn't know his size!

Instead, I decided to sew a monogram taggie that he could use for longer anyways!  I used a few fabric, batting, and velcro scraps along with some ribbon from my mom's stash.  I put in a lot of effort because my fabric & batting sandwich was wrong twice!  However, it ended up costing a total of $0!

Sewing Rewind: First clothing attempts...

My sewing practically came to a complete standstill in 2013, exactly when I started this blog.  Recently, I was finally able to get to some new items, and this sewing rewind reminds me of how far I've gotten in my skill set!  Now, I have just a few more sewing rewinds until I can say that I've completely documented all of my past projects in 2012.

You might be thinking, didn't she do a Sewing Rewind about her first clothing already?  Well, it was actually my first wearable clothing, and these are (for one reason or another) items that I haven't worn in public yet.  All worth it though even if just for the lessons I learned!

Warning: True beginning projects to follow!  Those averse to uneven hems, wonky stitch lines, and awful fabric choices avert your eyes now!  The rest of you brave souls may read on.


Elastic Waist Skirt

I had been taking my sewing class for a few weeks, dutifully making my pillowcases and other home decor when I started to get antsy about creating my own clothes.  It was nagging at me, so I searched online for a simple tutorial.  A couple of Youtube videos later, I decided to make my own skirt!

I found a gray fabric remnant for $1, and thought it would be a good fabric to try out since there was no stretch.  Voila!

Sewing Rewind: Works In Progress Edition!

This is a pretty embarrassing post, but I do it in the name of cataloging my past work without holding anything back.  Unfortunately, I have two as-yet unfinished projects to share with you: a green lace dress and a mustard yellow coat.  I keep thinking, "Maybe I'll finish these one day!" and they've sat for over four months now untouched!  Well here goes, warts and all...

In this post:


"Emerald is This Girl's Worst Friend" Dress


For this first dress, I had visions of an emerald green lace beauty like the one here.  The lovely lace overlay, button up front, scalloped lace hem and neckline, and cap sleeves were adorable!


Sewing Rewind: Self-drafted Edition!

At one point or another, we all decide to break out of the box and make our own patterns, either by modifying other patterns, using existing clothing, or making them from scratch.  This was TOTALLY difficult for me, because the patterns I had already sewed worked pretty well for me with very little alterations.  The prospect of failing was scary, and even though these projects were far from perfect, I learned from them and eventually tweaked them to my liking!

The reason I wanted to start sewing was to make a simple summer tank dress with an elastic waistband in fabrics that I liked.  I had been seeing a few in stores, but they were either really expensive, in a terrible fabric, or in a fabric that would be instantly recognizable to someone else who frequented the store.  That's when I decided that I would take a class to learn how to sew just a simple A-line dress.  Little did I know how obsessed I would get!


In this post:


Tank Dress, Bird tank & Ruched polka dot top

Tank Dress

For the first few weeks of class, I was very good at making my crafting projects and learning a few techniques.  In fact, I even finished a dress with sleeves, darts, and princess seams before attacking this item.  I was sure that I would totally rock it!


Please ignore the smushy dress form underneath!


And while yes, it looks fine, it wasn't what I was initially going for.  First of all, the skirt hugs the body too much because I wasn't sure how A-line my skirt should be.  So, I ended up hacking off too much.  Also, you won't be able to see this, but my pockets ended up much too low initially and some clever internal seams helped to fix this without ripping apart the entire thing!

And although I do love the fabric, it doesn't drape well.  I guess that's what happens when you don't follow the instructions on the back of the envelope (that doesn't exist).


I am impressed with how well the top fits though, and I won't make any changes to the pattern!

Sewing Rewind: Travel edition!

It's sewing rewind time again!  A week goes by so fast, doesn't it?  Anyways, coincidentally when I was making out a schedule of the projects I wanted to share, it didn't even occur to me that this post would be so fitting due to recent travels!

Right now, I am in New York and headed to Nashville tomorrow.  Tons of traveling, and today's featured projects are getting a some use right now!


In this post (jump to):

Cord Tamers, Packing Cubes & Jewelry Roll


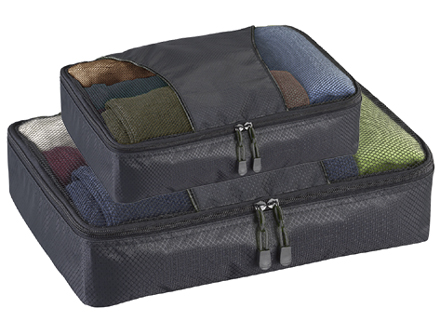
Packing Cubes

Last year I had a few weekend trips when I decided that I wanted to make something that would make it easy to organize my suitcase quickly.

Previously, I had been using large Ziplock bags for items such as toiletries, underwear, and makeup.  For my shoes, I was using some drawstring bags that my grandmother made and are still in perfect condition.  And for my clothes, I was using the vinyl bags that bedsheets are packaged in.


  • Pros: Everything was in clear bags and therefore easy to find!  Many bags with different categories made it easy to pick out exactly what I wanted (PJs in one bag, workout gear in another).
  • Cons: Plastic bags have no structure and fell over easily, with smaller bags of makeup, etc. falling to the bottom of the bag and becoming hidden and hard to find.  The bedsheet bags for my clothes were flat and therefore difficult to access the items at the bottom of the bag.


So I put together a wishlist of what I wanted:

  1. Clear
  2. Easy to access
  3. Semi-structured (to avoid smaller items falling to the bottom)
  4. Different sizes
  5. Inexpensive!


After finding out what worked and what didn't, I scoured the web to find a solution.  Nothing struck my fancy, until I spotted the packing cubes:


They seemed great for organizing, provided easy access to contents, sturdy, and came in different sizes.  However, they weren't clear, didn't have a small size, were super expensive!

So what's a girl to do?  Make her own!  I tend to do that...

Here's a view of the lower part of my suitcase with clothing, workout clothes, PJs, undies, and an extra for other clothing.


And here's the upper part of my suitcase with shoes in drawstring bags made by my grandmother (see better pictures here!), as well as toiletries, accessories, jewelry, charging cords, and a bathing suit + cover up.

Goggles / Sunglasses Cases & Sewing Rewind

*Update*  Tutorial available here!

Last night, I had a mini-sewing class with my cousin and taught her how to use a pattern and most of the parts of her machine.  It was a reminder of how far I've come in a short while!  Also, I finally took my machine out for the first time this year to sew the leather case below.

If you guys are interested, I can post a pattern & tutorial for these, so let me know!

Now, I'm not sure if you noticed, but I was having sewing rewinds on Tuesdays and Fridays before this.  It was severely cutting my ability to share projects that I'm working on now, and from now on I will have my rewinds only on Tuesdays!

Now for a peek at my sunglasses cases!


Please excuse the terrible lighting!  This was done at 5 am, so no daylight :(


When I first began to sew, I was completely focused on making projects for class.  So when my I lost my sunglasses pouch after going on a trip, I didn't think of making a case for it.

Then, I had a "duh" moment and decided that I could easily sew a simple pouch.  I looked around for a free pattern, and found a million of them!  Perfect!

But then, I remembered that I had oversized glasses where the tips of the arms tend to scratch the inside of the lenses.  See the bottom picture?

Sewing Rewind: My first wearable clothing!

First of all, I wanted to thank everyone who has been amazing with comments and emails of support and compliments.  I am certainly having a lot of "aw-shucks" moments lately!

Also, I updated my previous post here to include (slightly) better pictures of my Christmas dress, "fur" wrap, and NYE dress.

So for today, I thought I would share some of the first garments that I actually wore in public.  The first time I wore each of these items, I thought that either everyone would point and laugh or that it would completely disintegrate like a paper doll dress.

Luckily none of these things have happened, and I even had a couple of compliments!  Victory!

********************

In this post:


Orange Maxi Dress

Remember, I first began sewing in April and for the first several weeks I did a bunch of beginner projects (pillow cases, binder covers, etc.).  Then, I moved on to my first dress which I will blog about later.  It was a trial for a lot of techniques, but I knew I wouldn't wear it anytime soon.

By the time I finished, it was the end of June and I was in need of a fun summer dress!

I only decided to attempt a maxi dress because my sister (who is as short as I am) told me about how it actually made her look taller.  Sold!

I decided to use Simplicity 3503 and an orange stretch jersey with white stripes bought at the swap for $1/yard.  Because it had stripes, I didn't want to resemble a jailbird, referee, Waldo, etc. so I decided to cut the skirt with the stripes running diagonally at the bias.  I'm thrilled at how it turned out!

A tall drink of orange.  :)

(Non) Sewing rewind: Sewing Basket edition #2!

Last week I shared a few goodies that I made for my sewing basket: my pincushion cuff, sewing machine quilt, and the tailor's ham & seam roll.  This week, I wanted to share more items that all sewists need, which I made at home to save a penny or two.

Get ready to meet my ironing board, pattern weights, and dress form!

********************

In this post:


Pattern weights

There are a million and half tutorials out there for making pattern weights.  Some people don't mind spending $12 for 4 weights at the store, while others use soup cans, etc.  I am neither of those people!  I like to save money, and I prefer something pretty (besides I make my soup from scratch)!

Enter the ribbon-wrapped pattern weight.  Since making these, I would consider using fabric instead, but at the time I didn't have many cute scraps.  Besides, my mom had tons of ribbon she was itching to get rid of at the time.  Maybe one day I will redo them with a different scrap of fabric from each project I've done!


Sewing Rewind: A skirt, a shirt, and a coat... Oh my!

This post is a little late today because I needed to take photographs of this next set of clothing using the fancy camera I mentioned yesterday.  It was my first crack at a DSLR camera.  Fun!

The next few pictures are of items that I've made and actually worn!  And yes, I know I need to invest in a dress form eventually.

********************

In this post:


Red Beignet (high-waisted) skirt

My friend and I went to the Sew L.A. event back in September when Colette Patterns released their Fall patterns, which was the first time I encountered the beautiful patterns they offer!

Since I had only made a few other pieces of clothing (most not my style, but for practice purposes), this seemed like a good place to start with an actual piece of clothing I would like to wear one day!

I chose the Beignet pattern, even though it said intermediate!


For the fabric, I used some red poplin that I bought at M & L fabrics for $1.98/yard and the lining was left behind by someone in my class.  I bought the buttons at a swap meet, so I most likely spent $1 or less.  Definitely less than $5 all in all!

And here is how it turned out.


Red Colette Beignet skirt (unironed)  :(


My intention for this project was to serve as a muslin, figuring that if it turned out to be wearable, I could use it as a casual skirt.  Luckily, it turned out pretty well, and now I can avoid a few problems that I had while sewing it and make a few adjustments for my more expensive fabric.

I absolutely love the pop of lining that I used!  I almost wish I could have it peek out from the skirt a little.  Or maybe make some piping along the skirt with it next time.


Lovely lining

Sewing Rewind: Sewing Basket edition!


When I start anything in life, I dive in head first.  My family lovingly calls me obsessive, and I wholeheartedly accept that label!  Then again, I think of it as being thorough, or detail oriented, or something a bit nicer sounding.  :)

Hence, when I started this whole sewing venture, I wanted to have a well-stocked sewing basket with all of the supplies I would ever need.  My mother bequeathed a lot of her items to me, which my late grandmother used when she sewed at our house.

However, when I showed up to my first class, I realized that there were other items that I wanted!  So, I asked myself, "How can I have all the things I want, without spending an arm and a leg?"  DIY of course!

********************

In this post:


Pincushion Cuff

First on the list was a pincushion cuff.  I had the standard tomato & pepper pincushion, but I wanted to be able to wear it on my wrist just like my teacher.  I searched the internet and found a very cute tutorial from Michelle patterns here.

I used fabric that someone left at class for the flower, scrap fabric from my stash for the cuff, embroidery floss & a button from my mom's stash, extra stuffing from my stash, and a cottage cheese cover for the plastic inside.  All in all, $0 for this project!


Sewing Rewind: Sewing Basket edition! on Diane's Vintage Zest! #sewing #upcycle
Pincushion cuff in action!

.