February 2013 ~ Diane's Vintage Zest!

Spicy Chorizo Cornbread Stuffing

A spicy spin on my Cornbread Stuffing that EVERYONE loves!

Sweet Potato Souffle for Thanksgiving

One of my most popular recipes EVER, and just in time for Thanksgiving!

DIY Painted Photo Backdrops

Super easy backdrops for your photo, plus a few tips!

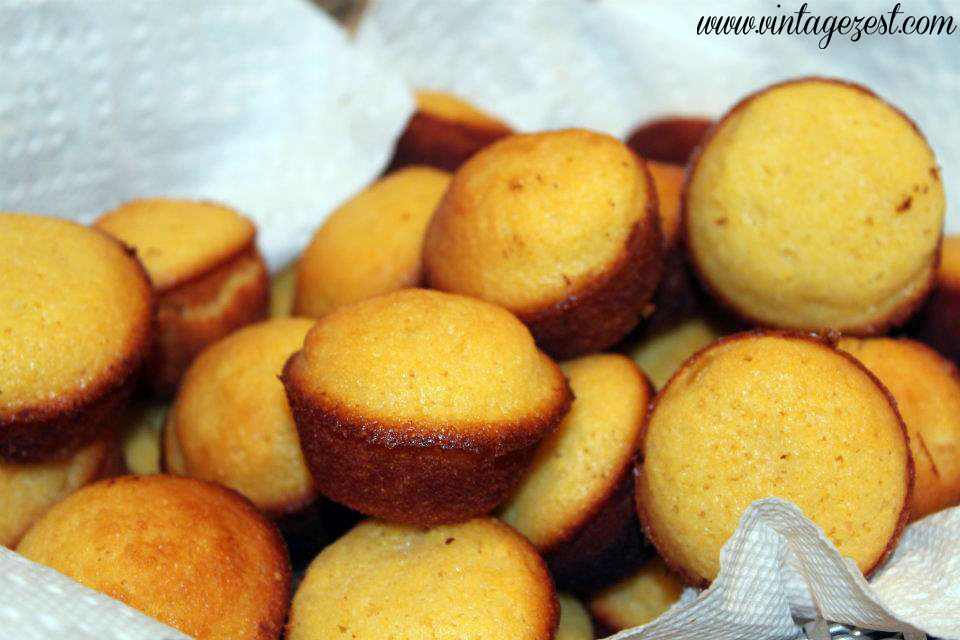
Golden Sweet Corn Bread Mini Muffins

A sweet spin on traditional cornbread!

Easy Sweet Potato Pie (without a crust!)

The easiest (and healthiest) pumpkin pie recipe ever!

DIY Magnetic Inspiration Boards (on a Budget)!


For the longest time, I really wanted to own a pretty memo ribbon board.  I had a boring cork board with equally dull thumbtacks.  The ribbon boards were so pretty, functional, and customizable to your needs.  Then when Pinterest came around, there were tons of tutorials about how to make all types of memo boards!


DIY Magnetic Inspiration Boards (on a Budget) on Diane's Vintage Zest!  #organization #tutorial


When I saw the tutorial for a magnetic memo board made from a cookie sheet, it was immediate inspiration.  However, being the overly detailed crafter that I am, I decided to make it a huge project.  The upside is, here's a tutorial about how to make your own magnetic inspiration board!


DIY Magnetic Inspiration Boards (on a Budget) on Diane's Vintage Zest!  #organization #tutorial


What You Will Need
  • Cookie sheet
  • Frame (or cabinet door) slightly larger than the cookie sheet
  • Cardboard, if the cookie sheet is not perfectly flat
  • Cotton batting
  • Upholstery nails
  • Fabric
  • Tape
  • Ruler
  • Pencil
  • Blank sheet of paper
  • Hammer
  • Nail
  • Pliers
  • Rubber Mallet
  • Magnets
  • Embellishments (paint, vinyl, stickers, etc.)


DIY Magnetic Inspiration Boards (on a Budget) on Diane's Vintage Zest!  #organization #tutorial


Disclaimer: I've never done a tutorial before, so be prepared for LOTS of pictures!

By the way, my project materials came to me while walking through IKEA.  A couple of As-Is cabinet doors for $4.99, and cookie sheets for $6.99.  I could have probably gotten the materials for cheaper at the dollar store, or with a bit of searching but I was antsy to start!  Also, I got two of each since I was trying out a new project from scratch and was sure to make some mistakes.


Instructions

Weekly Wrap-Up: Secret Projects & Tasty Dishes

When I started these weekly wrap-ups, I wasn't sure what they would be all about.  Now, I know that I like to document my food activities most of all.  Can you blame me?  That will definitely change in April when I get to share some of my exciting travel!

But for now, here is a week of local adventures.  :)


Precap: Read on for a few sneak peeks of three future projects, shopping fun, some yummy waffles at The Iron Press, and delicious seafood at Walt's Wharf!


Thursday

Remember last week, when I shared my deals from the Banana Republic Factory Store?  Well, it turned out that one of the items still had a security sensor in it!  I had to go back to have it removed, and in the process bought a few more items.  Oops!

And this time, I spent about $5 per item.  Yes, you heard me right.   That's four pretty garments for $20!  :)


The contrast band is so flirty and feminine!

Sewing Rewind: Hodgepodge edition!


When I was making up my sewing rewind lists, I ended up with a few projects that didn't really fall into one category or another.  Here is a hodgepodge of my past sewing projects, including a couple of fannypacks or waistbags, a body pillow cover, and a couple of pouches!  :)


In this post (jump to):


Sewing Rewind: Hodgepodge edition on Diane's Vintage Zest!


Dianne Von Furstenburg-Inspired Waist Bags

I was headed to Vegas for a weekend, and I wanted to bring a little pouch for the necessities: room key, money, ID, etc.  It's always a pain to have a huge purse, so I searched for a sewing pattern and came upon this from I Spy DIY!


Sewing Rewind: Hodgepodge edition on Diane's Vintage Zest!


I thought I could recreate it, so I headed to Jo-Ann's and bought fabric for the bag.  That was the easy part, but then I had to find a chain!  Since I was already headed to the swap meet for zippers, I thought I might find something and I did!

Here's what I came up with!


Sewing Rewind: Hodgepodge edition on Diane's Vintage Zest!


It can be worn cross-body style or at the waist!  And the chain that I found?  Eyeglass chains that people use to keep their eyeglasses around their neck!  I bought two of them for 50 cents apiece.  Yes!

Curried Red Lentil Soup

A few weeks back, Tessa from Handle the Heat posted a soup recipe that I was super excited try out.  You know that I love my soup, and have a bowl almost every day, even during the summer!  I had some difficulty locating the red lentils, but after I found them at a Middle Eastern grocery store, I whipped this up!

It's totally warm and comforting, perfect for cold weather.  While it's simmering on the stove, it smells absolutely heavenly throughout the house.  :)

Side note: I'm not sure how the red lentils completely lost their color, but the curry powder made the whole dish turn yellow!


Curried Red Lentil Soup on Diane's Vintage Zest!


I only made a few changes to the recipe below, but only out of necessity.  First of all, instead of a jalapeño, I used a few spicy peppers from the backyard.  Apparently I should have checked to see how spicy they were, because ironically my guy couldn't handle the heat!  Oops, more for me.  :)

Also, I did not use the mango chutney or yogurt to garnish, but the results were fantastic!


Curried Red Lentil Soup on Diane's Vintage Zest!

Curried Red Lentil Soup
From Eating Well via Handle the Heat

Saturday Synopsis!

This week has been a collection of ups and downs in my personal life, but the good thing is that there are always more ups.  Whew!

Luckily, I have been able to stay creative and keep a clear mind.  I'm excited for what's up for next week's posts and projects!


Saturday Synopsis!

Monday: One of my favorite, easy recipes for baked falafel.  Fast, healthy and delicious!

Tuesday:  Sewing rewind: In Progress edition.  I modified two patterns, which didn't turn out great the first time.  I still need a few tweaks to finish each one, but for right now they're a couple of UFOs that are haunting me!!!

Wednesday:  Weekly Wrap-up: Valentine's dinner, shopping for inspiration at Anthropologie & deals at the outlet stores, and patterns!

Thursday:  My pattern organization system.  :)

Friday: Addressing a pet peeve of mine: improperly hulled strawberries!  Yes, I full admit that I'm a bit of a nit-picker. :)


Tip: How to Hull Strawberries Without a Fancy Gadget

Disclaimer: I don't claim to be a chef, a food expert, or have extraordinary knife skills.  That means everyone will be able to find this a helpful tip!


Tip: How to Hull Strawberries Without a Fancy Gadget on Diane's Vintage Zest!


When I first started to cook for myself after college, I loved buying and using every gadget that Bed, Bath, and Beyond had to offer.  However, when I was growing up, my mom always said "Real chefs don't use gadgets."  At first, I didn't understand what she was talking about, but then I was introduced to the wall of gadgets with an avocado slicer, the cherry pitter, and mango splitter.

Chances are if the name of the gadget contains a specific food, it's a unitasker that Alton Brown would abhor and can easily be thrown out with the proper use of a knife.  I have since made my mom proud and brought my kitchen items down to the basics.


Last week during Valentine's Day, there were tons of dishes using strawberries and one of my pet peeves surfaced everywhere.


Tip: How to Hull Strawberries Without a Fancy Gadget on Diane's Vintage Zest!
This!

Do you notice the little piece of stem and a lot of the tart, white part (the hull) on the prepped strawberries?  No one wants to eat that!

Sewing Pattern Organization!

You may remember from yesterday's post that I bought a few patterns, which I love love love!

So now to the process of organizing them, which would be terribly boring for most people, but I have a system that I love!


First of all, I do not have a huge sewing/craft room, so everything that I need to sew has to always be immediately put away.  Also, I do not have space in any rooms or closets to store my patterns, so no filing cabinets like in the stores.  Of course, I dislike spending money when I don't need to, therefore it needed to be free or close to free.

After putting my thinking cap on, I came up with an awesome pattern organizing system for small spaces!  I'll go through the steps of how to replicate my system and what you will need.  Let me warn you that this may not work if you have an especially large collection of patterns, but my ever expanding pattern stash is growing and growing!


What you will need:

Weekly Wrap-Up: Valentine's Dinner, Anthropologie, Deals & Patterns!


Finally a normal weekend!  It seems that as soon as I started these weekly wrap-ups, my life started to get more interesting!

Book events, celebrity run-ins (here and here), sporting eventsconcertstrying out new sports, restaurants (1,2,3,4,5), warehouse sales, exploring around town, trips to New York and Nashville, planning a huge trip to Europe, and about a million donuts (1,2,3,4)!

Luckily, life is back to normal with just a few fun things along the way.  This week, the high points were Valentine's dinner with my man, shopping (Anthropologie, Off 5th, Banana Republic Factory), buying fun food items at Mitsuwa marketplace, cooking up three new recipes, pattern shopping, and getting a big chunk of travel planning done.


Wednesday

Valentine's Day was casual for my guy and me.  We decided that it is crazy to fight for a reservation at a fancy restaurant and be surrounded by tons of people who are doing the exact same thing, all in the name of a holiday that can tend to get out of control with decor, food, etc.  I'm not saying I'd turn away a pink cupcake though...

We went to Simmzy's, which I went to about a month ago for the first time.

To start we shared the Goat Cheese Tapas which doesn't look like much, but it was perfect!  Goat cheese with apricots and honey!  I'm in.  :)  I was majorly hungry and barely saved any for my guy, but then again he had his beer flight!


I got their Simmzy's Burger and added roasted Shiitakes.  So yummy!


The close-up shows off all the amazing goodies stuffed inside!

Sewing Rewind: Works In Progress Edition!

This is a pretty embarrassing post, but I do it in the name of cataloging my past work without holding anything back.  Unfortunately, I have two as-yet unfinished projects to share with you: a green lace dress and a mustard yellow coat.  I keep thinking, "Maybe I'll finish these one day!" and they've sat for over four months now untouched!  Well here goes, warts and all...

In this post:


"Emerald is This Girl's Worst Friend" Dress


For this first dress, I had visions of an emerald green lace beauty like the one here.  The lovely lace overlay, button up front, scalloped lace hem and neckline, and cap sleeves were adorable!


Falafel - Baked Not Fried!


The title of the post sounds like something a pitchman would say in an infomercial!  Believe me, one taste of these and you'll be sold.  :)

Middle Eastern cuisine is incredibly flavorful with tons of spices, herbs, and fresh vegetables.  I grew up eating falafel, but it was always fried.  Is it just me, or does it not make sense when a vegetable is fried?  If you're going to the trouble of eating a healthy item, why fry it?


For those of you who have never had falafel, it's almost like a meatball using chickpeas or garbanzo beans instead of meat.  It is also just as easy to make, if not easier!

The recipe I use is Ellie Krieger's Baked Felafel with some minor modifications, including no chopping (yay!), shaping the falafel differently, and using hummus instead of tahini.  Enjoy!


Falafel - Baked Not Fried on Diane's Vintage Zest@ #recipe #healthy #vegetarian


Baked Falafel
Adapted from Ellie Krieger

Saturday synopsis!

What a fun week of posts!  A little bit something for everyone with posts on cooking, sewing, mini-adventures, organization, and style watching.

By the way, thanks to everyone for reading and commenting!  Even though I started this out for myself to track projects, it's been fun to share my projects and have you guys send some love my way.  :)
What are the plans for this weekend?  For me, it's piecing together the last bits of my vacation plans!


Saturday Synopsis!

Monday:  The ultimate Carrot Cupcake recipe with my favorite Cream Cheese frosting!

Tuesday:  Sewing rewind: Self-drafted edition.  Three modified patterns, two fails, and one fun shirt! Apparently, I never wore it in front of my guy, so it became my Valentine's top for a casual dinner out.

Wednesday:  Weekly Wrap-up: 18 hours in Nashville visiting some of my old haunts.

Thursday:  The DIY solution I use for storing my jewelry!  

Friday: Looking through an episode of Hart of Dixie for some seriously cute outfits!


Style / Sewing Inspiration: Hart of Dixie!

I admit it.  I love a good teeny bopper show.  I grew up with My So-Called Life, Felicity, and Dawson's Creek.  Come on, remember how much you wanted to dye your hair bright red, or move to New York for a guy, or be part of a love triangle?

Anyways, nowadays my tastes have grown up.  Almost.  I can't help but watch some of the shows that are made for kids half my age!  One of my silly, guilty pleasures is Hart of Dixie.  Then again, the actors are actually still older than me, so I don't feel too bad.

One of my favorite parts is the cute outfits they wear.  I used to live in the South for a bit, so I thought maybe my taste changed to a more Southern, genteel style.  Then I found out that they wear a mix of Kate Spade, Anthropologie, J Crew, and other faves of mine.  While writing this post, I found out there is even a website that documents each episode!


Suzannah from Adventures in Dressmaking shared her love of How I Met Your Mother and other shows for sewing inspiration, and I have decided to do the same and share one episode of outfits from Hart of Dixie!

*Sorry in advance for the blurry screen-caps!  There are some better pictures here.*

I tend to prefer the Southern girls' outfits more, but this dress on Rachel Bilson's character is super cute!

DIY Jewelry Organization!

Happy Valentine's Day!  Or Happy Thursday to anyone who would rather not partake of the holiday and all of the chocolate that comes with it.  :)

Anyways, as you may remember, I shared my closet organization post and the DIY tool I use to make it even more organized, a couple of weeks back.  To follow up, I decided to share the DIY item that helps to keep my jewelry organized!  Hopefully this post comes in time to organize any new baubles or trinkets that you may have received (or gifted yourself) today!


DIY Jewelry Organization on Diane's Vintage Zest!


First of all, I have a large dresser with a drawer that I set aside specifically for jewelry and fragrances.


DIY Jewelry Organization on Diane's Vintage Zest!


I love having such a large dresser for my clothing, but it takes up most of the wall.  Therefore, I can't store my jewelry in a super cute hanging display.  Just check out my organization Pinterest board to see my love of hanging jewelry organization!


Weekly Wrap-Up: Nashville, Gaucho Grill, and TONS of Travel Planning!

Thankfully, this week was less action-packed but on the flip-side, I was definitely more stressed out!  A combination of time zone ping-pong and poring over travel details all weekend had me falling asleep at 8pm last night.

But I admit that I had some fun while out of town and during a dinner out with the whole family before my stressful weekend.  :)


Precap:


Little Miss in Nashville again!  If you're wondering who this is, click here!


Wednesday

Last I left you, I was in New York headed to Nashville.  I had less than 24 hours until my flight home, and even with a half day of work, I was able to squeeze in the most of a city that I used to know (enter Gotye & Kimbra).

Side note, I got to Nashville at about 11pm, and rented the silliest looking car ever.  Have you ever seen the inside of a Kia Soul?  It's like an advertisement all over the seats and inside the car doors.  Ridiculous!


Immediately after my obligations the next day, I met up with my Little Sister from Big Brothers Big Sisters from when I used to live here. I was starving, so we went to Arnold's Country Kitchen for a late lunch!


Sewing Rewind: Self-drafted Edition!

At one point or another, we all decide to break out of the box and make our own patterns, either by modifying other patterns, using existing clothing, or making them from scratch.  This was TOTALLY difficult for me, because the patterns I had already sewed worked pretty well for me with very little alterations.  The prospect of failing was scary, and even though these projects were far from perfect, I learned from them and eventually tweaked them to my liking!

The reason I wanted to start sewing was to make a simple summer tank dress with an elastic waistband in fabrics that I liked.  I had been seeing a few in stores, but they were either really expensive, in a terrible fabric, or in a fabric that would be instantly recognizable to someone else who frequented the store.  That's when I decided that I would take a class to learn how to sew just a simple A-line dress.  Little did I know how obsessed I would get!


In this post:


Tank Dress, Bird tank & Ruched polka dot top

Tank Dress

For the first few weeks of class, I was very good at making my crafting projects and learning a few techniques.  In fact, I even finished a dress with sleeves, darts, and princess seams before attacking this item.  I was sure that I would totally rock it!


Please ignore the smushy dress form underneath!


And while yes, it looks fine, it wasn't what I was initially going for.  First of all, the skirt hugs the body too much because I wasn't sure how A-line my skirt should be.  So, I ended up hacking off too much.  Also, you won't be able to see this, but my pockets ended up much too low initially and some clever internal seams helped to fix this without ripping apart the entire thing!

And although I do love the fabric, it doesn't drape well.  I guess that's what happens when you don't follow the instructions on the back of the envelope (that doesn't exist).


I am impressed with how well the top fits though, and I won't make any changes to the pattern!

Cream Cheese Frosting with Carrot Cupcakes and Raisins

There is almost nothing better than cream cheese frosting.  I could eat it on anything or on it's own.  At times, it even makes red velvet (IMO the most overrated "flavor") tolerable.  Please don't stop reading if you love red velvet, because I'm sure all  of us will be able to agree on my next recipe!


Cream Cheese Frosting with Carrot Cupcakes and Raisins


The hardest part of making cream cheese frosting is still having enough for your cake by the time it has cooled and figuring out what cake to put underneath it!

I love carrot cake in nearly all forms, but my preferences are as follows: a cupcake with (golden) raisins and cream cheese frosting.  Loaves are great, but I prefer a cute, pre-portioned little cake than I can eat all by myself.  Some people add zucchini, pineapple, or coconut and leave out raisins, but my favorite is with plain with some golden raisins dotted throughout.  Finally, I honestly don't understand who would use buttercream frosting or leave it (gasp!) unfrosted.

Why did I make two recipes?  First of all, I had a ton of carrots that needed to be used up (thanks Costco!), and I had just seen a carrot cake loaf recipe from Averie Cooks that I needed to make immediately.  And my old standby from Ellie Krieger is a tried and true recipe that I decided to make as well.

First are the two cupcake recipes side by side, and finally my resulting adaptation of both recipes into my ultimate carrot cupcake!


Cream Cheese Frosting with Carrot Cupcakes and Raisins
Basic ingredients for any carrot cake minus a ton of shredded carrot!


First up were the Ellie Krieger carrot cupcakes, which I was completely familiar with and they were done in a flash!


Cream Cheese Frosting with Carrot Cupcakes and Raisins
1...
Cream Cheese Frosting with Carrot Cupcakes and Raisins
2...
Cream Cheese Frosting with Carrot Cupcakes and Raisins
3!


Then, the Averie Cooks recipe was next!  The batter whipped up really fast and easy.


Cream Cheese Frosting with Carrot Cupcakes and Raisins
So yummy looking!
Cream Cheese Frosting with Carrot Cupcakes and Raisins


While waiting for both sets of cupcakes to cool, both sets of cream cheese frostings were whipped up!


Cream Cheese Frosting with Carrot Cupcakes and Raisins


And for the final products, drum roll please!


Cream Cheese Frosting with Carrot Cupcakes and Raisins
Ellie Krieger's recipe
Cream Cheese Frosting with Carrot Cupcakes and Raisins
Averie Cooks recipe


We had a taste test, and I know what you're thinking, "Why put a healthified recipe up against an obviously yummy recipe?"  Well, I know that if I make 18 cupcakes, I'm eating probably 16 of them.  Therefore, I need a recipe that I can't feel super guilty about.  When Averie says she takes BLTs (bites, licks, and tastes), it's obvious because she's in crazy good shape.  I admit that I wouldn't have the same self-restraint and must therefore attempt to healthify them.

For company, I will continue to make Averie's recipe unchanged because my guy just absolutely loved them as is and so did I.  I'm glad that most of them went to a Super Bowl party and not into my mouth!

For whole batches that stay in my house, I need to make a few changes here and there.  With my tweaks, my final product is nearly as good!

********************

Here's a quick summary of the changes I made:

  • Made cupcakes instead of a loaf.
  • Used half whole-wheat pastry flour and half all-purpose flour instead of only all-purpose flour
  • Used yogurt instead of buttermilk: This is for functional purposes only because I rarely have buttermilk on hand, and it doesn't change it much in my opinion!
  • Decreased both the granulated and brown sugar amounts
  • No use of allspice: I never have this, or seem to misplace it all the time...
  • Sifting the dry ingredients together prior to adding into the mixer:  Otherwise, I have lumps!
  • Increasing the amount of carrots: I like a carrot cake bursting with carrots!
  • Removing the butter, and substituting a combination of vegetable oil and applesauce.
  • Using a different cream cheese frosting based on Ellie Krieger's recipe with less sugar: I like a less sweet frosting at times, which is just personal preference.

Cream Cheese Frosting with Carrot Cupcakes and Raisins


Carrot Cupcakes with Raisins and Cream Cheese Frosting
Adapted from Averie Cooks and Ellie Krieger

Total Time: 45 min
Prep Time: 25 min
Cook Time: 20 min

Makes 20 cupcakes

Ingredients
Dry ingredients:
1 cup whole-wheat pastry flour
1 cup all-purpose flour
1 1/2 teaspoons baking soda
1 teaspoon baking powder
Pinch salt
2 teaspoons ground cinnamon
1/8 teaspoon ground cloves
1/8 teaspoon ground nutmeg

Wet ingredients:
1/2 cup brown sugar, packed
1/2 cups granulated sugar
1/2 cup canola or vegetable oil
1/2 cup applesauce
2 large eggs
3/4 cup yogurt
2 teaspoons vanilla extract

4 cups grated carrots (4-5 medium)
1 cup raisins

Cream Cheese Frosting:
8 ounces low-fat cream cheese, such as Neufchatel, softened
1 cup confectioners' sugar, sifted
1 teaspoon finely grated lemon zest


Directions

1.  Preheat the oven to 350 F.  Line muffin tins with 20 paper cupcake liners or spray with nonstick spray.

2.  Sift together the dry ingredients (flours, baking soda, baking powder, salt, cinnamon, cloves, and nutmeg).

3.  In a stand mixer with the paddle attachment, combine wet ingredients (brown sugar, white sugar, oil, applesauce, eggs, yogurt, and vanilla extract) until well combined.

4.  Add the dry ingredients and mix until combined, but do not overmix.  Stir in the carrots and raisins.

5.  Divide the batter among the muffin cups, filling only halfway.

6.  Bake in 350 F oven until a toothpick comes out clean, about 20 minutes.  Transfer the cupcakes to a wire rack to cool completely.

7.  Meanwhile, beat the cream cheese, confectioners' sugar and lemon zest until smooth and creamy.  Frost the cooled cupcakes.  Store leftovers in the refrigerator in an airtight container.


Please enjoy and let me know how you like these!


Saturday synopsis!

This was definitely a whirlwind week with traveling all over the U.S., and now I'm going to take the weekend to play catch up with e-mails, travel planning, and sleep!  There will definitely be a ton of Europe guidebooks in my future, so I plan on breaking out the white board & dry-erase markers again!

I hope everyone has a restful weekend too!


Saturday Synopsis!


Monday:  Venting about travel pains, sharing exciting upcoming travel plans, and a tip to scoring free internet on flights!

Tuesday:  Sewing rewind: Travel edition featuring my packing cubes, cord tamers, and jewelry roll!

Wednesday:  Weekly Wrap-up: dinner at Ado, Bruxie waffle sandwiches, my subway adventure in NYC, and running around NYC for food (Shake Shack, Momofuku, Rice to Riches, S'MAC, Jacques Torres Chocolates, Zabar's).  Mmmm!

Thursday:  Get a travel mascot!  I shared some of Little Miss' adventures and pictures.  

Friday: DIY Laundry folding board.  This almost makes folding laundry tolerable.  Almost!


DIY Laundry Folding Board

You may be asking yourself, how is a laundry folding board a travel item?  Well, you get back home and dump all of your clothes in the wash and end up with a ton of clothes to fold.  What a way to be welcomed home!

You might remember my post from a couple weeks back where I shared my closet and my folded clothes.  I promised a mini tutorial to DIY a folding tool, and here it is!


By the way, I made this after seeing an infomercial for a similar tool but didn't want to spend the $30 + S&H.  This ended up costing about $2, and is completely customized to my drawers!


What you will need:

  • Foam core board (any size that will fit the clothing you will be folding)
  • Measuring tool
  • Pen/pencil/Sharpie
  • Box cutter
  • Tape (clear packaging or duct)
  • Fabric or decorative paper (optional)


1.  Measure the drawer you will be using for your clothes.  Divide this measurement by the number of columns of clothes you will be store in your drawer.  Take this number and subtract 0.25" or so, to give space between the columns of clothing.  This will be Measurement A!


* My drawer width is 29" and I want 3 columns of clothes, so my equation is as follows:
    Measurement A = 29"/3 = 9.33 - 0.25 = about 9"


.